

There are several different versions of how to make this one point perspective city circle. I found Mrs. Ehlke's tutorial on this very helpful. My students and I had lots of fun adding in the details and making all different kinds of buildings. I encouraged them to have some tall ones, some short ones, at least one dome, one office, a lighthouse, a tower, etc., and to leave room for the sky. Some students sketched brick buildings, and rock buildings, and added windows with stained glass. Some picked a city theme, an architectural theme, or a farm theme. I found the variety very refreshing. Grades 1st-10th did this basically all together, and the youngest grades only needed a little bit of help from their teacher. Directions are included at the end of this post.


1. To make these, first draw a large circle on a piece of cardstock. I used a soup pot to make our circles. They were about 8" in diameter.
2. Next use a ruler and mark the center point, measuring left to right and then up and down to get a true center. (I made a master and then made copies on cardstock for the students.)

3. Next, using a ruler, have students draw 5 to 7 lines from one side of the circle to the next, making sure that each line passes through the center dot. These should not be the same--some should be close together while others should be further apart. 
4. Give students lots of ideas for their buildings. I hung three completed ones with a variety of building sizes and styles up on the wall for my students to see. I also hung up pictures of famous landmarks and verbally gave them many more ideas.
5. Encourage them to make some buildings taller and some shorter, reminding them that basically none of them should reach the top; lots of room should be left for the sky. A tree could go in one space, and there can be space in between the buildings as well; they don't all need to touch on the sides as long as the lines are slanted (larger at the bottom and pointing in toward the center dot getting smaller as the building goes up.)
6. Using a black felt tipped marker, trace over all the pencil sketching lines carefully. This should be a waterproof marker, especially if you plan to use watercolor.
7. Erase all of the pencil lines.
8. Use watercolor or acrylic paints to paint the buildings.
9. Go back over it with the black marker in places where the paint covered too much of the detail.
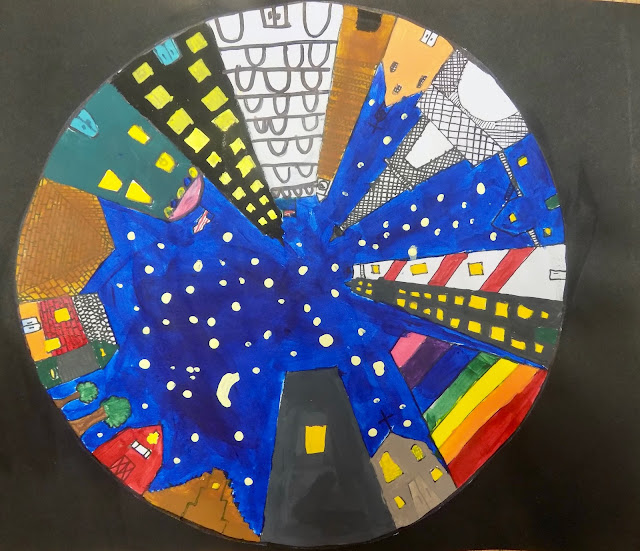
10. Choose a light blue daytime sky, possibly with clouds, or a darker nighttime sky. If choosing the latter, use the opposite end of the paint brush to make dotty-dot stars by dipping it into the paint and then gently stamping it vertically onto the paper.
11. Let the paint dry completely.
12. Cut it out and mount it onto black cardstock.


Watercolor daytime sky above, acryllic nighttime sky below


