Showing posts with label science experiments. Show all posts

Wednesday, February 23, 2022

How to Make a Steam Engine


In science class, we are currently studying the chapter on engines, force, energy, etc.  I'm always looking for something new to do because I like to learn and experience the things we read about, and the students learn more that way, too.  We had studied steam engines, and I'd never made a steam engine.  So I researched it, and we did. 

Using JB WaterWeld, which I purchased online, we attached the top of a pen cap to the spout of a pop can.  Then, using a sharp knife, I, not the students, poked a hole in the side of the can and attached the bottom of the pen to the can for a filling spout. (I was supposed to use one with a screw-on removeable cap, but I didn't use one of those, so we just used tape.  Maybe next time.).  


We used hot glue and wire to prop up the can and a moveable fan made out of cardboard, a thin wooden dowel, and the center of a toilet paper tube.  Then we filled the can about 1/3 full using a funnel and the top spout.  We put four tea light candles underneath the can and waited.  


Although it did work and steam came out of the spout, it didn't have enough power to move the fan blades.  We decided that the cardboard was too heavy, so we disassembled the first wheel and made a second one out of lighter paper.  That one didn't spin either, but at least we had tried, and we did make a little steam engine that blew out steam.  


Related Posts:


Monday, November 15, 2021

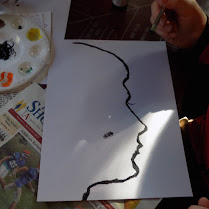
How to Make a Silhouette, or Science Art

We were studying light in our science classes last week and learning about transparent, opaque, and translucent materials.  We did the experiments, and then I had another idea, as I'm always looking for more hands-on projects.  A person's head is opaque, and I've been searching for a reason to make silhouettes, so we did.  

To make a silhouette, tape a piece of paper to a wall.  Have the subject sit fairly close to the wall on a chair.  Place a lamp about head-height a few feet in front of subject. Adjust the position of the subject or the paper until the outline of the head shows clearly on the paper.
 
While the person remains as still as possible, have someone else trace the outline of the subject's head.  (Blinking helps the eyelashes show up better.)  Take the paper off the wall.  Let the students carefully paint the outline using black paint and then fill it in.  
Random fact:  I haven't made these since I was in kindergarten in 1968, but I remembered making them, and I want my students to have the same opportunity.  Students really do remember the hands-on stuff they do!  

Wednesday, April 6, 2016

"E" is for Experiment - The "A, B, C"s for Christian Schools; 26 Topics We Have the Opportunity to Teach Our Students

Do the experiments in the science text books.
To be perfectly honest, the least favorite subject I have ever taught has to be physics -- and that is exactly what I am teaching right now as the last half of our science book is on physics -- oh, yay.  However, we have faithfully done every experiment except one, and even physics is starting to make a little more sense to me.  

As adults, we understand most of the basic concepts in the science books and it seems such a bother to assemble all the needed supplies, and then to take the time to actually do the experiments.  However, taking the time to do them does two things for our students.

1.  It enables them to see and understand science concepts.
2.  It makes learning science more fun for them.  

And, here is what I try to do every year.  In the summer, I go through the entire science text book and make a list of every item we will need for the experiments the upcoming year.  Then, I take several weeks to assemble this list.  I store everything in one bin, and we are set for the entire year.  


Tuesday, October 13, 2015

Sweet Cow Lung Air Compressor Demonstration

   When the 7th grade homeroom teacher, Mrs. Whitney Burkholder, asked to borrow our air compressor, I had no idea that she was going to use it to inflate cow lungs.  The above picture is the cow heart, and below are the lungs being inflated using the air compressor.    This was an inexpensive and really neat demonstration.  The cow parts were obtained free from a local butcher (for educational purposes).   It is refreshing to be around innovative teachers who go the extra mile to educate their students.   Even if they accomplish this by filling up stinking cow organs with loud, borrowed, air compressors.

                             
                                     deflated cow lung                        tankin' up            
                       
                       How's that for filling up down             operatic baritone style
                         low, Rosie?                                  (Everybody say "whoop, whoop"!) 


Friday, November 21, 2014

Muscle Guys and Mussel Girls

     Our high school science class this year is using Apologia’s Marine Biology. It is quite interesting. For instance, did you know that the shark’s sandpapery skin is actually made out of the same material as his teeth?
     The class has already dissected starfish, and next it was time to cut open a few clams. They didn’t really eat them, they were just having a little fun and learning a lot about God’s marvelous creation.


Tuesday, January 28, 2014

Achtung! Und Volcano!


We were studying Ancient Rome and Pompeii, and I thought it would be fun to make volcanoes that could actually “erupt”.  
I found this little project that another teacher had done and decided we would try it.  I paired the students up so that all of the younger ones had an older student to help them along as usual. It worked out pretty well, even though it was more time-consuming than I originally thought it would be.  Here is how we did it. 

                            How to Make Vinegar and Baking Soda Volcanoes

Art Sessions 1 & 2:  Tape a pop bottle to a board with masking tape, being careful to not cover the mouth of the bottle.
Cover the tape with newspaper and tape it to the board.
Mix 6 cups flour, 2 cups salt, 2 cups warm water, and 4 tablespoons oil.  Stir until it is lumpy, but pliable.

Spread salt-flour mixture over the top of the newspaper.  The thicker the better, though getting it too thick will cave in the newspaper.  We put two layers of this on in two separate sessions on different days.

One of the students decided to taste the mixture.  Since it was all edible, I told them it was all right and tasted some myself.  It was quite salty.
Art Session 3:  Paint the volcanoes black, red, yellow, and orange.  Some students added boulders, dinosaurs, roads, and trucks to their volcanoes.  (Guess, was it the boys or girls who did these things?)
Art/Science Session 4:  Once the paint has dried, fill the pop bottle about three-fourths full with really hot water.  Mix 1 cup vinegar, 4 drops red or yellow food coloring, and 6 drops liquid dish soap into a pitcher.  Pour the mixture into the bottle.  Add more hot water if needed to almost fill the bottle full.

Lay out three sheets of toilet paper, all connected.  Pour 2 tablespoons of baking soda lengthwise along the toilet paper.  Roll it into a tube and close ends tightly with a rubber band.

Quickly drop toilet tissue roll into volcano.  

We let each group go separately so that we could all see each eruption. We found that we got better results if we waited a little while and then shook the bottom of the volcano around a little bit.  Some were spectacular, some just foamed over; all worked to some degree and we had fun watching them erupt.  


Wednesday, November 6, 2013

Fire and Pepper


This year we are doing something a little different for our Friday afternoon art.  First of all, I am trying to come up with a few more interesting hands-on art projects, such as quilling and decoupage, which we have already done.

But today I thought we would try two science experiments.  Before we began I paired a younger student with an older one, and gave them my, “Be very careful and don’t try this at home speech”.   Then I passed out the metal bowls-- one for each lab partner.  One of the students asked what they were going to do with their “helmets”, so I had them put them on their heads.  Teachers must have a sense of humor.  Then we got onto the real stuff. 


The first experiment is done by putting pepper in a bowl of water, squirting dish soap on a finger, and then inserting the soapy finger into the water.  We watched all the pepper scoot out of the way as the soap film spread across the top of the water.  Simple, but fun nonetheless.

The second experiment was bit more risky, but I had a plan.  There was an older student in each pair, I’d given them my speech, and I trust them.  We were very, very careful.  We also had pitchers of water at each table, and fire extinguishers available just in case.
 They rolled tissue paper in oil and wadded it up. Then I carefully lit it and they (or I) dropped it into the bowl of pepper-soap-water.   We all watched as the paper burned for quite awhile in the  pans full of water.  The oil is lighter, so it floats on top of the water, and the oil keeps burning even though it is in the water.

Next week we are going to make paper maiche volanoes which will eventually “erupt” with baking soda and vinegar.  Stay tuned. 


Thursday, March 28, 2013

Cow Eyeballs and Hearts


The anatomy class has amazed me a few times this year.  They seem to really enjoy the class and studying the book, “Human Body” by Jay C. Wile and Marilyn Shannon.   

The cow eyeball was pretty interesting.  They learned all about the optical nerves, irises, lenses, and retinas.  The girls were intrigued too.

This is a picture of the fluid being removed from the lens.  

From left to right, the cow’s lens, iris, and tubeium.  

Boys will be boys.


Then came the cow heart-- or as they called it, “roast beef”.  Some of them decided they’d never eat roast beef again.  

They had to cut the heart open, then stick their fingers through the tubes until they touched in the middle of the heart.  They learned about relaxed and contracted ventricles, blood pressure and the fact that in just one minute, the volume of all the blood in  your body passes through the heart.


Maybe we will end up with a few missionary nurses or doctors here too, along with some teachers I hope.