Here are a few art ideas.
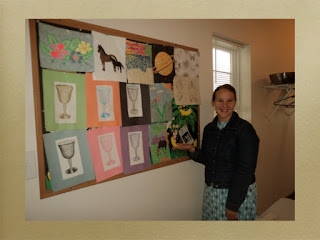
Have students submit a large, bold, pretty simple drawing. After you approve it they will spend a few quiet, happy hours tearing and pasting little pieces of construction paper onto it. We have art once or twice a week for one hour and this took a few weeks to finish. Some of the students worked on it if they had any other spare time.


Near the end of the year when the weather is nice and they are all well-behaved, you can have the older boys or a father cut cows (or other grazing types of animals) out of plywood. (Look up "cow coloring picture" on the internet. Print it out. Make an overhead from it on the copier. Put the overhead transparency on the overhead projector and project it onto the plywood which is leaning up against a wall. We let each student trace their own-- even the first graders.)
Before they could begin painting they were given a coloring page (made from the coloring picture off the internet that we used to make the overhead transparency) and had to submit a design that was approved by the teachers. (We had three different types of cows.)
Then then drew their approved design onto the cow using colored pencils.
We got leftover paint from painters (and some that one of the school board dads found in the trash), painted outside on nice sunny days, and then glazed the cows with a clear coat to protect them from the rain when we put them out in the ball field by the school using T-posts cut in half. The younger children got calves (like the Canadian flag one in the background) cut from half a sheet of plywood.

I do not have a picture of my favorite cow, the "Beach Cow". The rear leg was a palm tree trunk, and the rear end of the cow had the palm fronds painted onto it. The cow also had sunglasses and an Hawaiian lei painted around its neck.
Origami!!! Several simple designs can be created easily from directions in library books or found on the internet. It is better to learn how to do just one, then do it with different sizes and colors of paper. One year a few students made swans that were so small they could fit on the end of a pencil eraser. To see more creative origami made by our students, click HERE.

One project we did last year left us with giant sea creatures hanging from the ceiling.
Students first found sea life pictures in library books or in encyclopedias. It took one art period to find the design and transfer it to a piece of paper to be approved by the teacher. The next one to two art periods were spent transferring and enlarging the designs to large pieces of cardboard we'd been saving all year, much to the dismay of the sewing ladies. We got most of the cardboard pieces from a hardware/appliance store which saved them up for us. After painting them we hung them from the ceilings with fishing line and had them there for the end of the year program/open house.
Students first found sea life pictures in library books or in encyclopedias. It took one art period to find the design and transfer it to a piece of paper to be approved by the teacher. The next one to two art periods were spent transferring and enlarging the designs to large pieces of cardboard we'd been saving all year, much to the dismay of the sewing ladies. We got most of the cardboard pieces from a hardware/appliance store which saved them up for us. After painting them we hung them from the ceilings with fishing line and had them there for the end of the year program/open house.


How to make scrolls
Cut desired sizes of paper from large art paper rolls, or you could just use copier paper and do little ones. Roll them into long tubes and burn the edges using a candle. Adults should obviously do this unless you have older students. For this project the teacher burned the edges for grades 1st-6th and we let the 7th-11th graders do their own. We had only one small mishap and no one was hurt :-). Blow out the flames pretty quickly as you only want a little burned effect on the edges. Next burn the top and bottom sides.
Then get several large tea bags (family size) and soak them in 1 cup of warm water until the water is dark brown. Using the tea bag as a dabber, blot the entire paper with the tea to give the paper a parchment look. The darker the tea, the better the effect, and large areas of pooled tea make nice dark blotches. Let this dry several hours. Aiming a fan at them can help speed this process.
For the final stage of this project give the students images of several different alphabets. We used Chinese, Japanese, Hebrew, Babylonian (pictured on the right below), and Greek. The youngest of the students made interesting treasure maps.
These also make great decorations for the mid-year or year-end program, or look great just hanging on the walls of your school before the students get to take them home.

Paint the walls!
This won't work at every school, but this particular school was an old chicken house that had been converted into a beautiful, very functional school. The "gym" was the lower level and was covered with OSB and painted white. The students decided to do a panorama of the valley they lived in. Each student got a certain section of the wall. One wall was the downtown, the second wall was the long road that went through the valley, the third wall was the school itself, and the fourth wall, the vegetation in the valley, was shared by the 1st-5th graders. The four walls were also different seasons; fall, winter, spring and summer. (Yes, she added a harness.)


(below) The elementary students did one smaller wall, with each of the students contributing one part of the drawing (i.e. a tree, a garden, a bear, a cat etc.)


It is always fun to display as many of your art projects as you can at the mid-year or year-end program. To see more art projects, click HERE.